
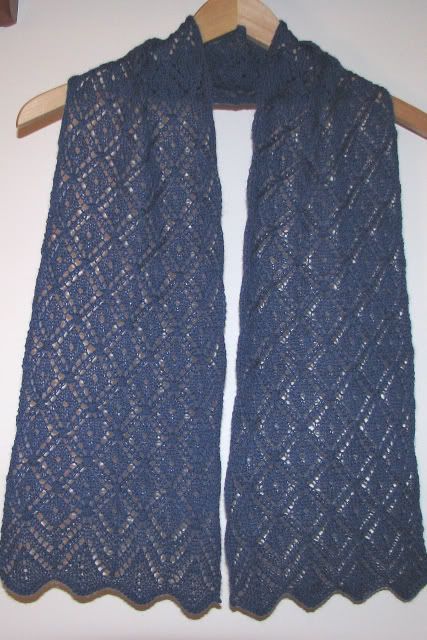
Trellis Scarf
My Trellis Scarf is finished! The bulk of the scarf took 3 weeks to finish, then I spent another week knitting and frogging the finishing border. I read on Ravelry how people were unhappy with the finishing border ending straight across when the beginning border has points. Turns out, just working the beginning border backwards does NOT give you the reverse! I figured it out though, or at least well enough to give a pointy finish without having to block the bejeezus out of it (which can be done with the pattern as written if you bind off loosely enough). Did I mention my blocking pins have all gone AWOL? Haven't a clue where they are. Probably on a warm beach somewhere.
So, here it is!
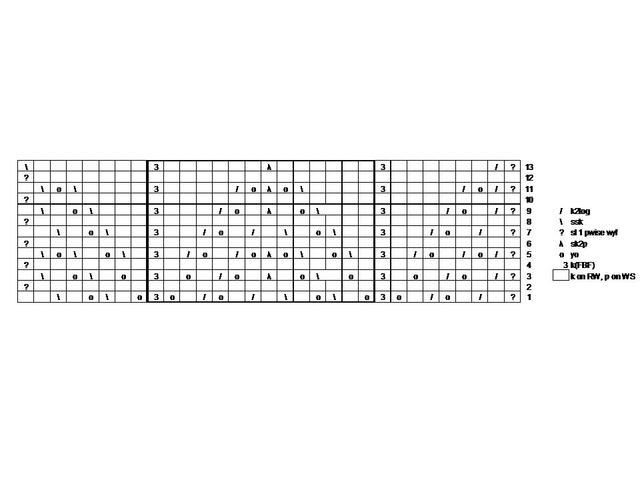
Here's what I did to get the ending to match the beginning: When you reach the end of the 23rd repeat, as in the pattern, work the first 8 rows of the Lace chart in the pattern, then the first 4 rows of the Ending Border. For the 5th row, and every following odd row, create a "point" in the stockinette section of the pattern repeat by making the center stitch (this is the stitch immediately to the right of the pattern repeat box) into three stitches by knitting into the front, then the back, then the front again of the center stitch without dropping the stitch from the left needle (k(FBF)). After you have created the three stitches from one, drop it off the left needle. To accomodate the two new stitches in the center of the repeat, you need to decrease at the left and right sides of the "triangle" using k2tog on the right side and ssk on the left.
So, for Row 5: sl 1 pwise wyf k2tog yo k2tog k yo k2tog k k(FBF) *k ssk yo k ssk yo sk2p yo k2tog k yo k2tog k k(FBF)* k ssk yo k ssk yo ssk k
The stitches in red above are the alterations from the original chart. If you have the pattern, hopefully you will be able to see easily how this propagates up the chart.
Here's my attempt at a chart, made in Excel. I hope it is clear enough to print! You can email me or pm me through Blogger if you want me to email you the Excel spreadsheet.
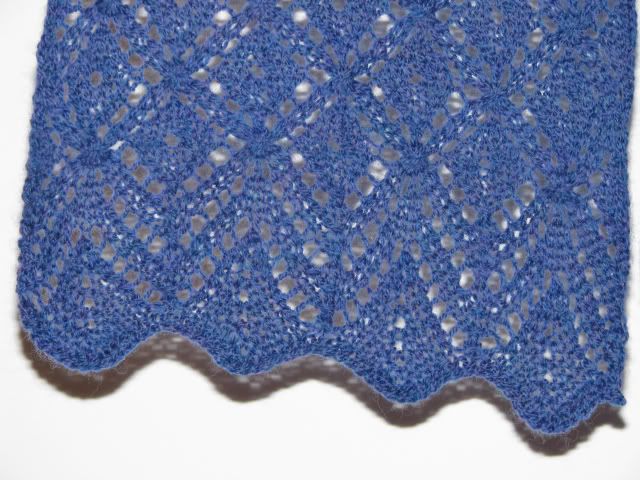
From top to bottom: my "new" Ending Border, the border as written in the pattern, and the Beginning Border (placed upside down for comparison).

So now what?
Stashbusting - socks and lace
WIPbusting - the quilt I started cutting out pieces for
budgetbusting - order more stuff for spinning. I decided to get a tensioned lazy Kate and some bobbins for plying, because the balls-of-energized-singles-in-a-coffee-mug just isn't working out. I tried to make a Kate out of a shoebox, as shown here, but it just isn't working at all for me. Now, the Kate and bobbins aren't all that expensive, but they only get me half way to free shipping, so I should order a new spindle and some fiber to get to that free shipping minimum, right?
I'll have to think about it some more.
So, here it is!
Pattern: Trellis Scarf
Designer: Evelyn A. Clark
Source: Interveave Knits Spring 2006
Yarn: KnitPicks Shadow, Jewels
Needles: US5
Began: 1/19/2008
Finished: 2/20/2008
Designer: Evelyn A. Clark
Source: Interveave Knits Spring 2006
Yarn: KnitPicks Shadow, Jewels
Needles: US5
Began: 1/19/2008
Finished: 2/20/2008
Here's what I did to get the ending to match the beginning: When you reach the end of the 23rd repeat, as in the pattern, work the first 8 rows of the Lace chart in the pattern, then the first 4 rows of the Ending Border. For the 5th row, and every following odd row, create a "point" in the stockinette section of the pattern repeat by making the center stitch (this is the stitch immediately to the right of the pattern repeat box) into three stitches by knitting into the front, then the back, then the front again of the center stitch without dropping the stitch from the left needle (k(FBF)). After you have created the three stitches from one, drop it off the left needle. To accomodate the two new stitches in the center of the repeat, you need to decrease at the left and right sides of the "triangle" using k2tog on the right side and ssk on the left.
So, for Row 5: sl 1 pwise wyf k2tog yo k2tog k yo k2tog k k(FBF) *k ssk yo k ssk yo sk2p yo k2tog k yo k2tog k k(FBF)* k ssk yo k ssk yo ssk k
The stitches in red above are the alterations from the original chart. If you have the pattern, hopefully you will be able to see easily how this propagates up the chart.
Here's my attempt at a chart, made in Excel. I hope it is clear enough to print! You can email me or pm me through Blogger if you want me to email you the Excel spreadsheet.
From top to bottom: my "new" Ending Border, the border as written in the pattern, and the Beginning Border (placed upside down for comparison).

So now what?
Stashbusting - socks and lace
WIPbusting - the quilt I started cutting out pieces for
budgetbusting - order more stuff for spinning. I decided to get a tensioned lazy Kate and some bobbins for plying, because the balls-of-energized-singles-in-a-coffee-mug just isn't working out. I tried to make a Kate out of a shoebox, as shown here, but it just isn't working at all for me. Now, the Kate and bobbins aren't all that expensive, but they only get me half way to free shipping, so I should order a new spindle and some fiber to get to that free shipping minimum, right?
I'll have to think about it some more.


2 Comments:
The scarf turned out beautifully! I love the ends! Gorgeous!
I am so glad I came across your blog post! I'm just over halfway done with my scarf, and I know these instructions will come in VERY handy when I'm getting ready to finish. Thanks!
Post a Comment
<< Home